

In 2016 I helped out at my local puppet studio with a Halloween half-term class for kids aged 4-6. The class helped the kids make a hand-held spooky head and arm attached, which they could use to make a puppet show for their parents later that day.
It inspired me to make my own version. Alas, it took me a while to finish as life got in the way, but it’s finally done and looks great!
Here’s how I did it.
Supplies I used:
- Newspaper
- PVA glue
- Cardboard (a cereal box)
- A wooden dowel
- Faux fur (I bought mine from eBay for under £5)
- A ping-pong ball
- POSCA paint pens
- Sharpies
- Acrylic paint
- Milliput (modelling clay)
- Aluminium foil
- A small foam sheet
- Sellotape and masking tape
Tools I used:
- Hot glue gun
- Paintbrushes
- Craft knife
- Scissors
- Plastic sheet for making a mess on!
Method:
- Cut out a large circle in the cardboard cereal box for the head and make a cut into the middle. Fold the circle around the centre to make a more conical shape. Tape this together.
- Cut the wooden dowel to fit inside your head (snug). Then, hot glue the wooden dowl to the top and bottom of the inside of your cone. This is what you will hold your head up with.
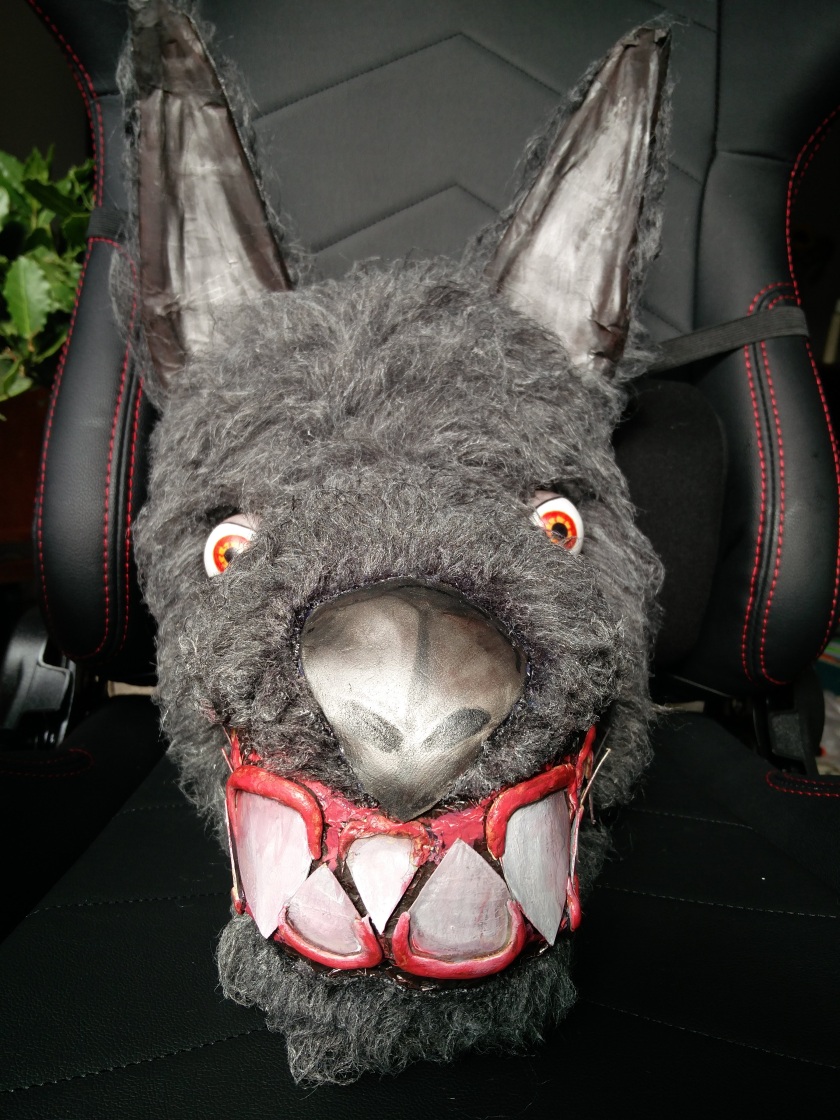
- Cut out some ears to fit your head and stick these on top with tape. Save some card for cutting out teeth later.
- Roll up the newspaper into balls and tubes, and stick to the cone with tape. The aim here is to create the shape of a face. I stuck a huge mound on the front to create a snout. I also used tubes to create brows around the eye sockets, and cheekbones to emphasise the slender snout. Tape these all on in place.


- Rip of lots of strips of newspaper for papier mache, put some of your PVA in a pot and get our your brush!
- Once you have an approximate wolf head shape you’re happy with, begin to papier mache a layer of newspaper over the top of the whole head. Once dry (leave it for a day to dry naturally or dry with a hairdryer), reassess your head for extra shape. I definitely added more padding here and papier mache’d over this as a new layer.
- Try to do at least 2 layers of papier mache over your face structure.


- Once dry, paint your head using acrylic paint with a base layer of colour.
- NOTE – As I created this head over the course of a year, in hindsight with a clearer plan I could have done this better. My method is slightly convoluted, and I evolved as I worked.Next, I crinkled some aluminium foil and put it across the mouth area, where the gums and teeth would show. I painted this lightly with dark grey paint.
- Now you know how big your mouth will be, it’s time to draw some teeth on the cardboard you put aside and cut them out. Paint them however you like. I used first acrylic paint, but then overwrote it with POSCA paint pens as I wasn’t happy and it’s very easy with POSCA!
- Before putting on your teeth, draw on the foam sheet you have a nose for the head. Cut it out and stick it in place using PVA or hot glue. My nose is a bit wonky (the only thing I wish I could change on this head), but I accept it brings him character :).
- Stick on your teeth using hot glue.
- I wanted to create gums that stuck out, and couldn’t get the dexterity I needed with rolled newspaper, so I used milliput. You can probably find a better material to use for this. I stuck on rolls of milliput over each tooth as gums, and once it was dry I painted them with POSCA paint pens.
- Take the ping-pong ball and cut it carefully in half using your craft knife. Draw on an eyeball with sharpies, and hot glue it onto the head.At this point you should have everything on your head, but fur. (I changed my eyes last minute to ping-pong balls)


- Cut out pieces of fur to fit the head. I cut one for the top of the snout which reached to the top of the head and over the eyes, one for under the snout, and two for the sides of the head. I also cut two pieces for the backs of the ears.
- Stick these fur pieces on using PVA glue.
- I used a black POSCA paint pen to colour in the edges of the faux fur, as the fabric which holds the fur was white, and I didn’t want that showing!
- Using scissors, trim the fur if necessary.
- Using PVA glue, rub the glue into the fur like you would if you were making crumble for a fruit dessert – using your finger-tips. The goal here was to make him look matted and dirty. I rubbed PVA along all edges, into all fur and added bigger blobs for extra texture, and an uneven coat.
- Once it’s dry, he’s done!


